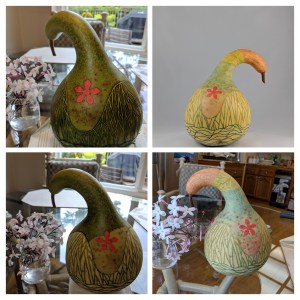
Another way to decorate a gourd! I used the gourd’s skin as a stencil, but in a different way from the Pawehe Process. The gourd skin is removed in the desired pattern, exposing a dry-ish hard shell, so that color can be applied from the outside, essentially using the skin as a stencil. Once the applied color is dry, the remaining skin is removed, leaving the design on the gourd shell.
Skill Level: Medium
Assumes some knowledge of hard shell gourds, alcohol inks, gourd cleaning and finishing, and related tools.
List of materials
- Fresh gourd, at the right stage of dryness (see below)
- Carving tools: X-acto blade, small knife, clay carving tools
- Alcohol inks and application tools
- Spray finish (Krylon, etc)
Select a Gourd
Stenciling works best on a fresh gourd that has very few blemishes on its skin (mold, scrapes, etc). Select a gourd in the later stages of drying: stem is brown all the way to the gourd, skin is still green and cool to the touch, and a small scrape of skin on a test area reveals a hard, tan shell that dries easily.
Both of these examples sat in a cool room for 4+ months after harvest. They felt noticeably lighter than their weight at harvest due to natural moisture loss. A dry-ish gourd with good skin, but not too dry, yields a drier shell that better accepts the alcohol ink.
Carve the Skin, Wait for Shell to Dry
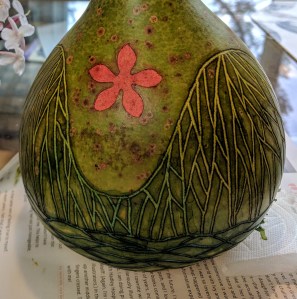
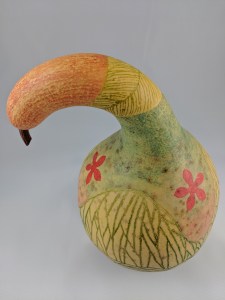
Select a design, or carve a pattern freehand. In the first example, I used a stencil and marker to lightly draw the flower on the gourd. Then I removed the skin using dull x-acto blades (my tool of choice here), carefully scraping off all the skin defining the flower. Remove the skin exactly as in the Pawehe Process, taking care to remove skin cleanly at the edges for strong lines and avoid scratching the hard shell underneath. The color(s) will be applied to the exposed hard shell. This differs from Pawehe Process, where the color comes from inside the gourd. With stenciling, accidental nicks and scrapes do not matter as much as they do with Pawehe Process.
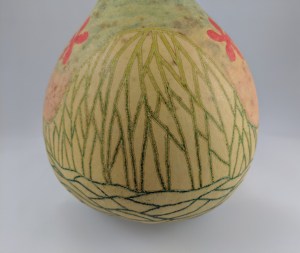
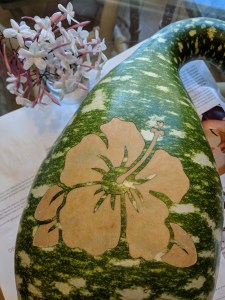
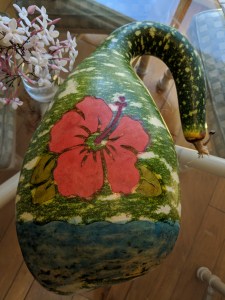
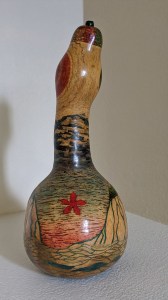
In the second example (details of finished piece shown), I used clay carving tools to remove the skin in thin, even lines to create the hills and water patterns. The tan color is where the skin was left on; the green and blue lines are where I removed the skin and later applied color. For the red flower, a stencil was used.
After carving your design, set the gourd in a dry place for at least 4 days. This lets the exposed shell dry out, allowing it to accept the ink better. Wipe with a mild bleach solution daily to prevent mold on the skin – we want to keep the skin stencil in good shape until the ink is applied.
Note: If you see signs of mold (black or brown spots), start applying color immediately! The mold may cause the shell to dry with dark spots that can’t be removed.
Apply Alcohol Inks, Let Dry
Use a small applicator, sponge, brush or Q-tip to apply alcohol ink to the exposed shell. It is okay to get ink on the skin, which is now our stencil. It will be scraped off in the next step.
To achieve a greater intensity of color, let the ink dry at least 2 hours and reapply. Notice that I would avoid any unwanted scrapes on the skin, other than my design, while applying the inks. If any skin was left on accidentally, in a place where color is desired, the ink may reveal the skin at this stage. Simply scrape it off and reapply color.
It is also possible to allow the natural patterns of alcohol ink to appear, or use alcohol ink blending solution to create a pattern.
After the color is applied, let the gourd (ink) dry for several days. Avoid touching the inked areas.
Remove All Gourd Skin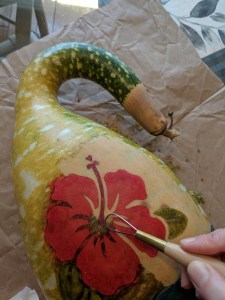
Using an X-acto blade or clay tools, remove all the skin from the gourd. Take care not to touch the inked parts with fingers or tools as it may smudge and be transferred to the newly exposed shell.
When scraping close to the edge of your design, near an inked part, scrape from the skin towards the inked area to avoid smudging.
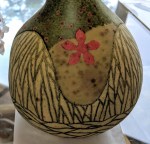
The example on the left has the skin partially scraped off. Notice the spots on the newly revealed, uncolored shell. These are mold spots, caused by natural breakdown of the skin. If I had been on top of things, I would have noticed these spots and scraped the skin sooner. Oops!
Let It Dry
Let the gourd dry thoroughly. Without a protective finish, the ink will still be susceptible to smudging. If the finished gourd will be opened and cleaned (seeds removed), your cutting/cleaning technique is likely to smudge the color. Apply a varnish to protect it (see next section). If dry cleaning the inside (recommended with this technique), always wear a protective mask.
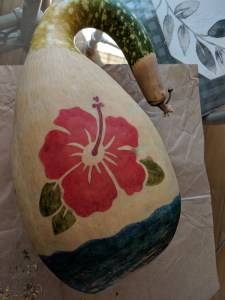
After removing all the skin, if additional color is desired, let the newly revealed gourd shell dry another day or two. In the second example, on the right, I diluted the alcohol ink with cleaner, and lightly applied the red, blue and orange colors. Once dried, I lightly sanded the orange section at the top for a textured look.
Don’t forget to experiment and have fun!
Apply Finish
To seal the ink and give a nice protective finish, I use Krylon® spray products. Many users of alcohol inks suggest using Krylon® Kamar Varnish first, to set the ink without changing the appearance or pattern in the ink. After the Kamar varnish a top coat (or two) is needed. I like to finish with a brush-on polyurethane varnish or Krylon® UV-Resistant Clear Coating.
Gallery
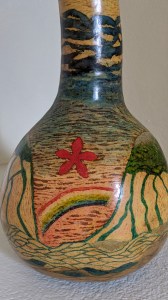
Hawaii Waters, 2020. The areas with fine image detail were done with skin stenciling. After scraping the skin letting the gourd dry completely, I filled in the plain (no color) areas with light inking.
† My carving season starts at first gourd harvest in the Fall and last until I run out of gourds. I had two fresh gourds left, but did not find them to be good candidates for the Pawehe Process.
