Pawehe technique was developed by the ancients from the Hawaiian island of Ni’ihau as one of many ways to decorate ipu. Briefly: carve the skin off a fresh gourd, then dye it from the inside out as the skin left on will draw out the dye. It was a lost art until the late 1980’s when Dr. Bruce Ka’imiloa Chrisman rediscovered the technique through trial and error. Web research, experimentation, and modern materials have led me to do it as described here, with the utmost love and respect for the Hawaiian culture.
These videos featuring artist Michael Harburg : The Ipu Guy (may encounter ads) and The Lost Art of Ipu Pawehe were not only educational but the original inspiration for my ipu pawehe journey!
Terms
- ipu – a simple translation: the word for “gourd”; in Hawaiian language it is an instrument made from a gourd; may be decorated in a fashion other than pawehe (see discussion here)
- pawehe – also called Hawaiian gourd tattoo, or Ni’ihau technique
- fresh gourd – a gourd fresh from the patch, green in color, not dried. In my case grown in my yard or on a local farm. California agricultural laws strictly prohibit importing fresh gourds from Hawai’i (or any fresh produce from anywhere), so I try to grow my own or use what’s available locally in Autumn
- carving – using a knife or blade or some sort of scraper to remove just the skin from the hard outer shell of the gourd; it can feel like peeling apple skin (thin, waxy) off a hard, round surface
Selecting ipu
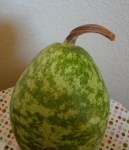
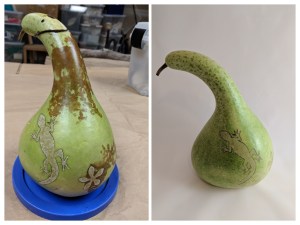
A fresh gourd ready for carving will have had a long, healthy life (4 – 5 months) growing in the ground or container. It should be left on the vine until the vine becomes dry and brown right up to the top of the gourd. This helps to ensure it has developed fully, meaning a strong, thick shell underneath smooth green skin. The gourd should be very heavy and the stem dry and withered as shown in the picture.
Carving
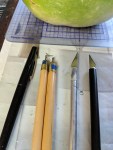
Carving for the first time can feel strange. Like anything, with practice, you WILL get the hang of it. I prefer to use dull, i.e. used, x-acto blades. I recently started using clay sculpting tools, useful for adding texture. Try different tools to figure out what works for you. I often create a paper stencil for my designs, then gently draw it on the gourd skin using a black felt marker. Drawing or carving freehand, letting a design emerge on the gourd as you work can be fun, too.

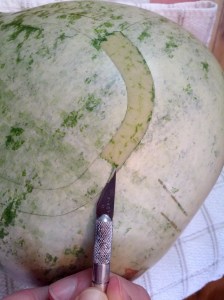
I use my dullest x-acto blade (actually dull and tip broken off) when I want to score defining lines in the design, using a lighter or heavier touch depending on how much I want the line to appear. Then I use the dull, pointed blade at an angle to gently remove the skin. Every bit of skin left has the potential to pull the dye through the shell. You can remove the skin with a clean line as shown to the right, or leave bits on for subtle shading.
Other ipu pawehe artists recommend a waiting period, about 5 days, before filling with coffee. I haven’t found a specific time to wait, and often other factors necessitate filling it immediately, such as my schedule, how long it took to carve, how dry and/or moldy the skin is. This is more of an art than a science – experiment and have fun! The health of your gourd, the length of time since harvest, your local temperature or humidity – all will play a role in the process.
Opening: To Cut or Drill?
The easiest and quickest way to open the gourd is to cut the top off. I developed a technique that conserves much of the gourd by drilling only a small hole in the shell. I love gourds so much, I don’t want to waste any part of one! For beginners I recommend cutting the top off.
Cut Top: To cut the top off, use a small hand saw to gently remove the top, cutting low enough to remove the stem and strong fibers just inside the shell. You have now exposed the inside of the gourd. No need to remove seeds and pith.
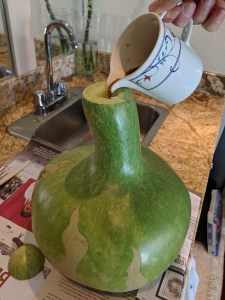
Drill Hole: Use a drill bit the size of a drinking straw and place the hole strategically above the body or carved part of the gourd (picture next section). You must also drill a hole to allow air to escape as you fill it. For the air hole I use a smaller bit and place it near and above the filling hole. Make sure the two holes connect inside. *This method requires more time and patience in filling, and can get quite messy!
With either technique, you may need to break through the fibrous insides to allow coffee to flow in to the body. An ice pick or skewer or the like will come in handy. With a large neck, where the fibers are especially thick, I will often use a 3/8 drill bit to remove plugs of material.
Dyeing
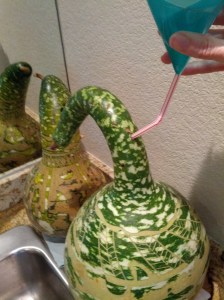
I use room temperature water to make instant coffee at 2x or 3x strength. If your gourd is too green you may only get a small amount to go in. Be patient. Try again in a day or half day. The liquid will sink through the innards over time, creating channels for more coffee. You may add 1/4 cup or less per day for a while until the gourd is ready inside to take a lot of coffee.
Notice the hole shown on the gourd at left is on the side. In this case I use a segment of straw with the elbow bend to help the liquid pour through the funnel easier.
Keep it full of coffee. Some may need a daily top up, others every other day or less. I have even gone out of town for a week, topping up on return, and still gotten great results.
Alternative: I have used green food color (old, old bottle from the 90’s) to great effect; others have used colored dyes, and even red wine!
Waiting
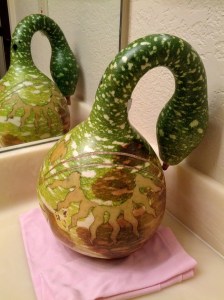
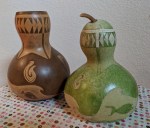
There is no way to predict exactly how long it will take to dye the gourd; some say 4 – 6 or 6 – 8 weeks. Things that affect it: gourd thickness, temperature, humidity, gourd age and health. The top two pictures show gourds at 3 and 4 weeks “on coffee”, respectively. On the left you can see where the skin is “pulling” the coffee through to the outside. The skin, if healthy and not molded, will continue to pull coffee (or pigments) out. Where there is no skin, no coffee (or at least very little) will pass through. Thicker gourds make need to be on coffee 8 weeks.
This pretty little one started showing color after just 1 week. Why?! Mostly likely it was harvested before full maturity, resulting in a thin hard shell. Will need very gently handling for the rest of the process.
Once I get a gourd full of coffee, I store it in the garage to keep mold out of my house. It is colder out there (I live in Northern California) but safer for us.
Important: depending on your unique environment, your gourd may be exposed to molds that grow on the skin. Wipe it down gently with a mild bleach solution often.
Cleaning
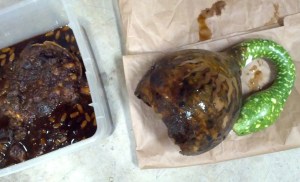
At this point the gourd is heavy, from the liquid inside, and slippery on the outside. Handle with care, or what your see to the right may happen – sadness! I carefully pour the unsightly mess of seeds, pith, and old coffee through a colander with a bucket underneath so I can dispose of the solids separately.
The skin should come off easily at this point. I use a nylon scrubby, the side of a spoon, or my fingernail to scrape it off. It can be messy, and coffee stains! so be careful if you are inside. I like to set up outside with two buckets and the hose nearby. You will want to clean all skin off, and remove all pith from the inside. Get creative with poking tools to loosen it – bottle brush, screwdriver, etc. Another method is to add pebbles or large screws, shake it up and pour it all out. The small items will rip the pith off the inside. Nose plug optional!
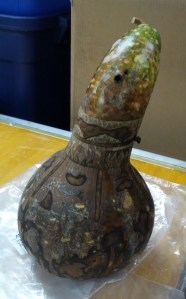
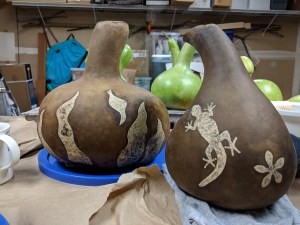
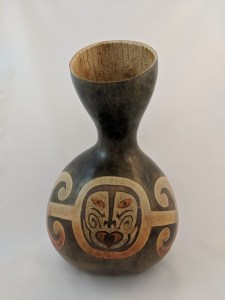
I hope you are looking at beautiful tans and browns showing your design at this point! If the contrast is not as you expected, wait a day or two. The flame gourd pictured to the left, on the left, was very light when I first cleaned it. Two days later it had developed to a lovely brown.
Drying and Preserving
Dry completely before painting or finishing. Depending on your environment, it could take weeks or months. Mine often develop a thin layer of white mold, which is easily removed by wiping.
Finish with varnish, like water-based polyurethane or tung oil finish, such as Formby’s Tung Oil Finish. This will bring out colors and protect it.
